
yourgenieus
Safe Args : 프래그먼트 간 데이터 전달, intent로 외부 앱 공유 본문
Android/Android Kotlin 기초 실습 정리
Safe Args : 프래그먼트 간 데이터 전달, intent로 외부 앱 공유
EOJIN 2022. 10. 26. 01:501. Safe Args 플러그인 설정 및 사용
- 사용자가 앱 내에서 게임 결과를 공유하기 위해서는, 하나의 fragment에서 다른 fragment로 매개 파라미터를 전달해야 함
- 이러한 transaction의 오류를 방지하고 type-safe로 만들기 위해, Safe Args라는 Gradle 플러그인 사용
- 이 플러그인은 NavDirection 클래스들을 생성하며, 우리는 이 클래스를 코드에 추가하면 됨
Safe Args 플러그인이 필요한 이유
- 대부분의 경우 앱은 fragments 간에 데이터를 전달해야 함
- 어떤 fragment에서 다른 fragment로 데이터를 전달하기 위한 방법 중 하나는 Bundle 클래스의 instance를 사용하는 것
- Android Bundle은 key-value를 저장하는 저장공간임!
- key-value store (a.k.a dictionary or associative array)
- 고유한 키(string)와 관련된 값을 가져오는 데이터 구조
- 예)
- key-value store (a.k.a dictionary or associative array)
| key | value |
| "이름" | 아니카 |
| "날씨 변화" | 실패 |
- App은 fragment A에서 fragment B로 data를 전달하기 위해 Bundle을 사용함
- A는 bundle을 생성한 후 key-value 쌍에 대한 정보를 저장한 후, 그 Bundle을 fragment B로 전달함
- B는 key를 사용하여 key-value 쌍을 Bundle에서 얻음
- 이 기술은 작동하긴 하지만, 코드가 컴파일은 되는데 실행 시 에러가 나는 결과가 나올 수 있음
- Type missmatch error : A는 string을 보냈는데 B는 정수를 요구하면 0을 반환 함 -> 0은 유효한 값이니까 컴파일 시 오류가 나지는 않으나 사용자가 앱을 실행할 때 오류로 인해 충돌할 수 있음
- Missing key orror : B가 Bundle에 설정되어 있지 않은 key를 요구하면 null을 반환함 -> 이 역시도 컴파일 시 오류가 나지는 않으나 실행 시 오류 날 수 있음
- Android Studio에서 앱을 컴파일할 때 이러한 오류를 파악하여 앱을 배포하기 전에 오류를 알아챌 수 있어야 함
- 앱 개발 중에 오류를 파악하여 사용자가 오류를 파악하지 않도록 해야 함!
=> 그래서 Android의 Navigation Architecture Component에는 Safe Args라는 기능이 포함되어 있음 - Safe Args는 Gradle 플러그인으로, 컴파일 시 앱이 실행될 때까지 나타나지 않을 수 있는 오류 탐지에 도움이 됨
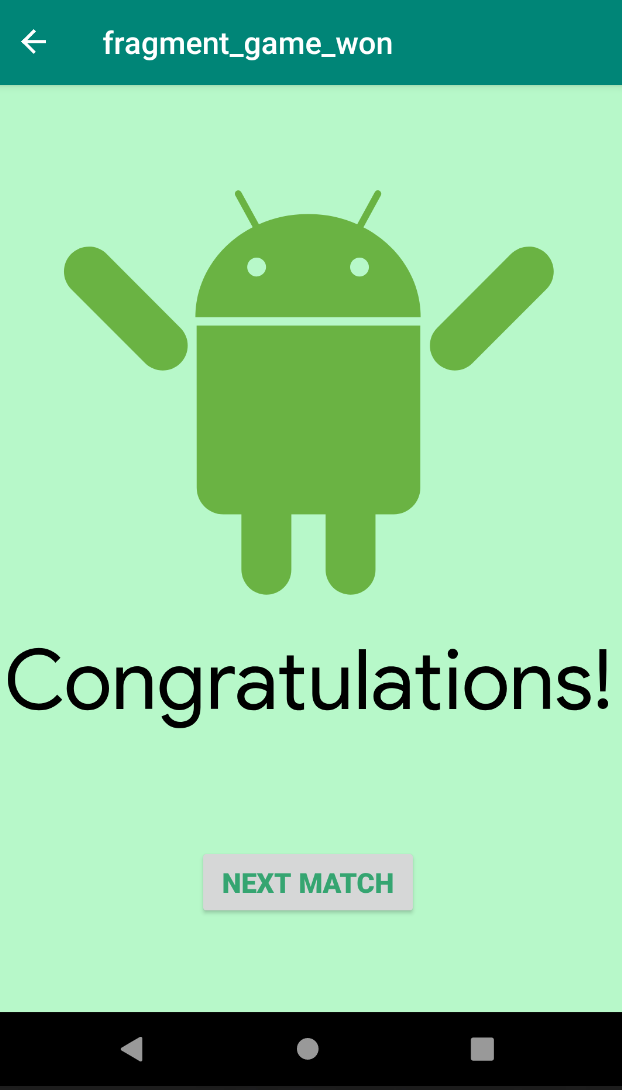
STEP 1 : Open the app and run it
- 게임 진행해서 이기면 Congratulations 화면이 나타나는 앱
- 우리는 이 축하 화면의 상단에 share icon을 추가할 것! 이 아이콘을 통해 사용자는 결과를 이메일 또는 메세지로 공유할 수 있음
STEP 2 : 프로젝트에 Safe Args 추가
- 프로젝트 수준의 build.gradle 파일 열고
- navigation-safe-args-gradle-plugin을 dependencies에 추가
// Adding the safe-args dependency to the project Gradle file
dependencies {
   ...
classpath "androidx.navigation:navigation-safe-args-gradle-plugin:$navigationVersion"

}- 앱 레벨의 build.gradle 파일 열고
- 파일 맨 위의 다른 모든 플러그인 뒤에, apply plugin을 androidx.navigation.safeargs 와 함께 추가
// Adding the apply plugin statement for safeargs
apply plugin: 'androidx.navigation.safeargs'- 싱크하면 이제 app project는 NavDirection 클래스를 포함하고 있음
- Safe Args 플러그인은 각 fragment를 위한 NavDirection 클래스를 생성함
- 이러한 클래스는 모든 앱 actions의 navigation을 나타냄
- ex) GameFragment 는 GameFragmentDirections 클래스를 가지게 됨. 우리는 GameFragment와 다른 fragments들 간에 type-safe arguments를 전달하기 위한 GameFragmentDirections 클래스를 사용하면 됨!
- 생성된 파일을 보고싶으면? Project > Android Pane > generatedJava 폴더
- NavDirection 클래스는 프로젝트가 컴파일될 때마다 재생성되므로 편집해봤자 소용 없음!
STEP 3 : GameFragment에 NavDirection 클래스 추가
- game fragment에 GameFragmentDirections class를 추가하여 추후 GameFragment에서 GameWon/OverFragment로 arguments를 전달할 때 사용할 것!
- GameFragment.kt 를 열고
- onCreateView() 메소드 안에서 게임에서 이겼음을 판단하는 조건문 찾기
- NavController.navigate() 로 전달되는 매개변수 변경 : action ID를 GameFragmentDirections 클래스에서 얻은 actionGameFragmentToGameWonFragment() 로 변경!
// Using directions to navigate to the GameWonFragment
view.findNavController()
.navigate(GameFragmentDirections.actionGameFragmentToGameWonFragment())- 마찬가지로 게임오버 조건문에는 GameFragmentDirections에서 얻은 actionGameFragmentToGameOverFragment() 로 변경
// Using directions to navigate to the GameOverFragment
view.findNavController()
        .navigate(GameFragmentDirections.actionGameFragmentToGameOverFragment())
**이제 actionGameFragmentToGameWonFragment()에 파라미터를 추가할 거임!
2. Arguments 추가 및 전달
- type-safe 인수를 gameWonFragment에 추가하고 GameFragmentDirection 메소드로 안전하게 전달하기
STEP 1 : game-won fragment에 arguments 추가
- res > navigation 폴더의 navigation.xml 파일을 열고 Design 탭을 클릭하여 navigation graph 열기
- 이 그래프는 fragment 에서의 arguments를 설정함
- preview에서 gameWonFragment 선택
- Attributes Pane에서 Arguments 섹션 선택
- + 아이콘을 클릭하여 Argument 추가 - 이름은 numQuestions, 타입(Android Studio 3.2 이하는 argType)은 integer, 그리고 Add 클릭
- 사용자가 응답한 질문의 수를 나타냄
- 두 번째 인수도 추가! numCorrect - Integer : 사용자가 올바르게 대답한 질문의 수를 나타냄
STEP 2 : Arguments 전달
- numQuestions와 questionIndex를 GameFragmentDirections 클래스의 actionGameFragmentToGameWonFragment() 메소드로 전달
- GameFragment.kt 를 열고, 이겼음을 따지는 조건문 찾기
- numQuestions와 questionIndex를 actionGameFragmentToGameWonFragment의 파라미터로 전달
- 질문의 총 갯수 : numQuestions, 현재 하고 있는 질문 : questionIndex
- 이 앱은 사용자가 모든 질문에 정답을 맞췄을 경우에만 데이터를 공유할 수 있도록 설계 됨
- 정답의 수는 항상 질문의 수와 같아야 함
- GameWonFragment.kt 안에서, Bundle에서 arguments를 추출한 후 Toast 를 사용하여 arguments를 표시
- onCreateView() 메소드에서 return 전에 아래의(두번째) 코드 추가
// Adding the parameters to the Action
view.findNavController()
      .navigate(GameFragmentDirections
            .actionGameFragmentToGameWonFragment(numQuestions, questionIndex))
val args = GameWonFragmentArgs.fromBundle(requireArguments())
Toast.makeText(context, "NumCorrect: ${args.numCorrect}, NumQuestions: ${args.numQuestions}", Toast.LENGTH_LONG).show()- 앱을 실행하고 잘 전달됐는지 확인!
STEP 3 : Fragment 클래스를 NavDirection 클래스로 대체
- "safe arguments" 를 사용하는 경우 navigation code에 사용된 fragment class를 NavDirection class로 대체할 수 있음
- 이를 통해 앱의 다른 fragment와 같이 type-safe 인수를 사용할 수 있음
- TitleFragment, GameOverFragment, GameWonFragment 안에서, navigate() 로 전달하는 actionID를 변경하기!
- 그 action ID를 NavDirection 클래스 내의 동등한 역할의 method로 변경
- TitleFragment.kt 를 열고 onCreateView() 안에서, Play button의 click handler 안에 있는 navigate() 메소드 찾기
- 그 메소드의 argument로 TitleFragmentDirection.actionTitleFragmentToGameFragment() 전달하기
- GameOverFragment.kt 파일의 Retry Button의 클릭 핸들러 안에 있는 navigate()의 argument로 GameOverFragmentDirections.actionGameOverFragmentToGameFragment() 전달
- GameWonFragment.kt도 위와 같이 GameWonFragmentDirections.actionGameWonFragmentToGameFragment() 전달
binding.playButton.setOnClickListener { view: View ->
    view.findNavController()
            .navigate(TitleFragmentDirections.actionTitleFragmentToGameFragment())
}

///////////////////////////////////////////////////////

binding.tryAgainButton.setOnClickListener { view: View ->
    view.findNavController()
        .navigate(GameOverFragmentDirections.actionGameOverFragmentToGameFragment())
}

///////////////////////////////////////////////////////

binding.nextMatchButton.setOnClickListener { view: View ->
    view.findNavController()
          .navigate(GameWonFragmentDirections.actionGameWonFragmentToGameFragment())
}
앱 실행 잘 되는지 확인! (아직 화면 상으로 바뀌는 건 없음)
3. 게임 결과 공유
- 앱에 공유 기능 추가
- Android intent, 특히 implicit intent를 사용하여 구현됨
- 공유 기능은 GameWonFragment 클래스의 options menu를 통해 access할 수 있음
- App UI로는, 축하 화면 상단에 share icon으로 menu item이 나타날 거임!
Implicit intents
- 지금까지는 navigation components를 사용하여 activity 내에서 fragments를 navigate 함
- Android에서는 다른 앱이 제공하는 activity로 이동할 수도 있음!
- 앱에서 이 기능을 사용하여 게임 결과를 친구와 공유할 수 있음
- Intent : Android components 간의 communicatioe에 사용되는 단순한 message object
- explicit와 implicit의 두 가지 유형으로 나뉨
- Explicit intent : 명시적 의도
- 특정 타겟에게 메세지를 보낼 수 있음
- Implicit intent : 암묵적 의도
- 어떤 App 또는 Activity가 작업을 처리할지 모른 채 Activity를 시작함
- 예를 들어, 앱이 사진을 찍도록 하려면 일반적으로 어떤 앱이나 Activity가 작업을 수행하는지는 상관 없음
- 여러 개의 Android 앱이 Implicit intent를 처리할 수 있는 경우, Android는 사용자에게 선택지를 보여줌으로써 사용자가 요청을 처리할 앱을 선택할 수 있게 함
- 각 implicit intent는 수행할 작업의 유형을 설명하는 ACTION이 있어야 함
- 일반적인 acions, ACTION_VIEW, ACTION_EDIT, ACTION_DIAL 과 같은 것들은 Intent 클래스에 정의되어 있음
**Intent actions는 app의 navigation graph에 표시되는 action과 관련 없음!
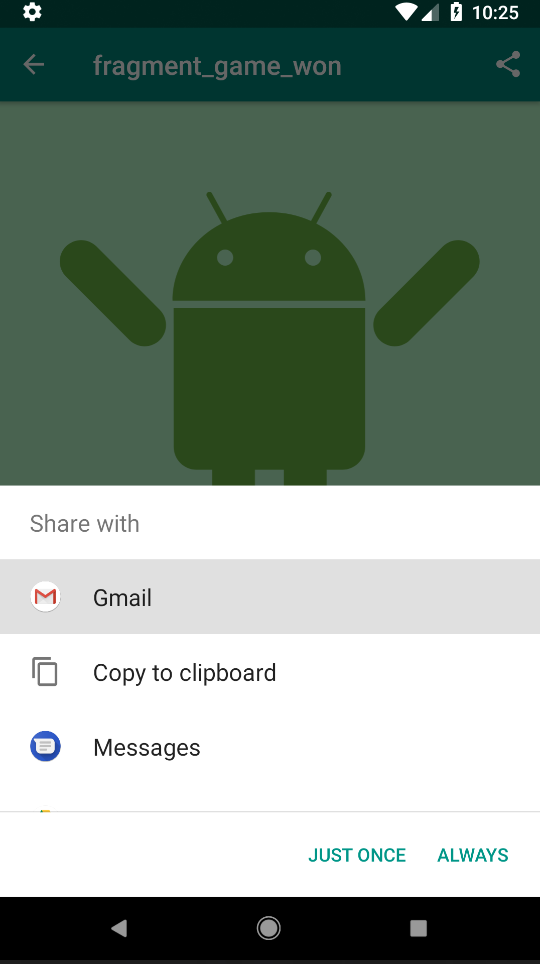
STEP 1 : 축하 화면에 options menu 추가
- GameWonFragment.kt를 열고
- onCreateView() 메소드 안에서 return 전에, setHasOptionsMenu를 호출하여 true를 전달함
setHasOptionsMenu(true)STEP 2 : Build and call an implicit intent
- 사용자의 게임 데이터에 대한 메세지를 보내주는 Intent 추가
- 여러 개의 서로 다른 앱이 ACTION_SEND intent를 처리할 수 있기 때문에, 사용자에게 정보 전송 방법을 선택할 수 있는 선택지가 나타남
1. GameWonFragment 클래스 안에서, onCreateView() 메소드 다음에 getShareIntent() 라는 private method 만들기
args 클래스의 값을 설정하는 코드에서 사용되는 코드는 onCreateView() 에서 사용되는 코드와 같음- 이 private method의 나머지 부분에서는, 사용자가 공유를 원하는 메세지를 전달하기 위한 ACTION_SEND intent 구축
- 데이터의 MIME 유형은 setType() 메소드에 의해 지정됨
- 전달되는 실제 데이터는 EXTRA_TEXT 에 기재되어 있음
// Creating our Share Intent
private fun getShareIntent() : Intent {
   val args = GameWonFragmentArgs.fromBundle(requireArguments())
   val shareIntent = Intent(Intent.ACTION_SEND)
   shareIntent.setType("text/plain")
            .putExtra(Intent.EXTRA_TEXT, getString(R.string.share_success_text, args.numCorrect, args.numQuestions))
   return shareIntent
}
2. getShareIntent() 메서드 다음으로 shareSuccess() method 작성
- 이 메소드는 getShareIntent()에서 Intent를 받아와서는 sharing을 시작하기 위해 startActivity()를 call 함
// Starting an Activity with our new Intent
private fun shareSuccess() {
   startActivity(getShareIntent())
}
3. starter code에는 이미 winner_menu.xml 메뉴 파일이 포함되어 있음
- GameWonFragment에서 onCreateOptionsMenu()를 override해서 winner_menu를 inflate 하기
- shareIntent를 얻기 위해 getShareIntent() 사용
- shareIntent가 Activity로 확실히 연결되기 위해, 디바이스에 설치된 앱과 액티비티를 추적하는 Android Package Manager(PackageManager) 확인하기
- Activity의 packageManager 속성을 사용하여 package manager에 access하고 resolveActivity() 를 부를 수 있도록 함
- result가 null 과 같을 경우 shareIntent가 resolve되지 않았다는 뜻이므로, menu에서 확장된 sharing menu item을 찾아 보이지 않도록 함
// Showing the Share Menu Item Dynamically
override fun onCreateOptionsMenu(menu: Menu, inflater: MenuInflater) {
       super.onCreateOptionsMenu(menu, inflater)
       inflater.inflate(R.menu.winner_menu, menu)
       if(getShareIntent().resolveActivity(requireActivity().packageManager)==null){
            menu.findItem(R.id.share).isVisible = false
       }
}- Menu item을 핸들링하려면, GameWonFragment에서 onOptionsItemSelected()를 override하여 menu item이 클릭됐을 때 shareSuccess() 메소드 호출!
- startActivity를 사용하기 위해 onOptionsItemSelected()를 사용하는데, Intent를 그걸 handle할 수 있는 다른 앱으로 전송하기 위함!
- 사용자가 menu item을 탭하면 intent가 발생하며, 사용자에게는 SEND ACTION에 대한 선택사항이 표시 됨
// Sharing from the Menu
override fun onOptionsItemSelected(item: MenuItem): Boolean {
        when(item.itemId){
            R.id.share -> shareSuccess()
        }
        return super.onOptionsItemSelected(item)
}
앱 실행해서 확인하기!
'Android > Android Kotlin 기초 실습 정리' 카테고리의 다른 글
| LifecycleObserver, onSaveInstanceState() (0) | 2022.10.26 |
|---|---|
| Life Cycle 및 Logging - Timber (0) | 2022.10.26 |
| Navigation : Navigation components, drawer 등 (0) | 2022.10.26 |
| Fragment : fragment 생성 및 layout에 fragment 추가 (0) | 2022.10.25 |
| Data binding (0) | 2022.10.25 |
'Android/Android Kotlin 기초 실습 정리' Related Articles
more


Comments